Sensitivity Summary
The Sensitivity Summary is a configurable report in Capex Strategy that shows how sensitive a key financial metric is to changes in selected model parameters. You choose the target parameter and the sensitivity drivers directly in the report. The system varies each driver by ±10%, calculates the impact on your target metric across all active alternatives, and displays the results in a ranked table.
You configure the report yourself, in the report header. No project setting or model builder preparation is needed.
How sensitivity analysis works
The report is built around two inputs that you select:
Target parameter: the financial metric you want to evaluate, for example NPV or IRR. All results are expressed as changes in this value.
Sensitivity parameters: one or more model rows that are varied during analysis. Each is shifted by +10% and -10% independently.
For each sensitivity parameter, the report shows two result columns, -10% and +10%, giving the target parameter value after the corresponding variation. A Before column shows the original target parameter value with no variation applied.
Calculation period
Results are shown for one calculation period at a time: 10, 20, or 30 years, counted forward from the project's current reporting year. Select the period you want from the Calculation period dropdown in the report header.
A period is only offered if it fits within your project's period settings, so a project with a shorter horizon may see fewer options.
The calculation period is not saved. Each time you open the report it defaults to the shortest available period, normally 10 years.
Which alternatives are included
All active alternatives are included automatically. To leave an alternative out, deactivate it before opening the report.
📌 Note: Access permissions apply. Alternatives under a private strategic business block are included in the report, and in the ranking, only for users who have access to them. Two colleagues may therefore see slightly different results for the same project.
Opening the report
Go to Capex Strategy and open the Presentations section.
Select Sensitivity Summary from the list of presentations.
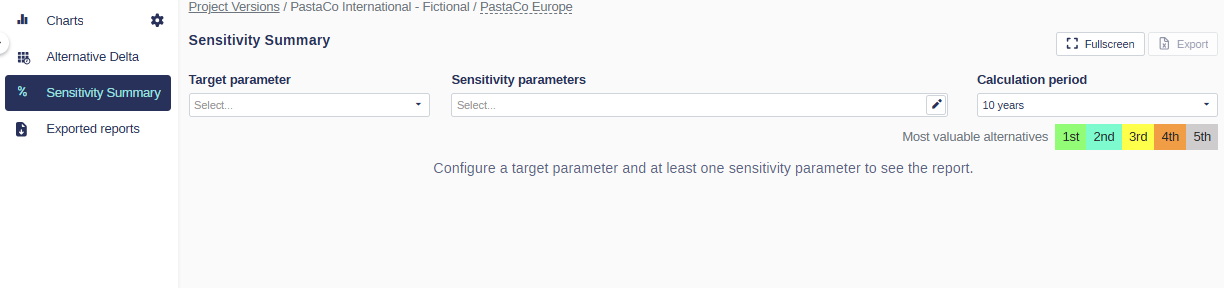
Until you configure it, the report shows the message "Configure a target parameter and at least one sensitivity parameter to see the report."
Configuring the report
You configure the report directly in its header, using three controls:
Target parameter dropdown: the model row to use as your reference metric.
Sensitivity parameters selector: one or more model rows to vary during analysis.
Calculation period dropdown: 10, 20, or 30 years.
Your target parameter and sensitivity parameters are saved per project and shared with everyone working in it. The next person who opens the report sees the same configuration.
Selecting a target parameter
The target parameter is the metric used for comparison and ranking across alternatives. Every result in the report shows how this value changes when a sensitivity parameter is varied.
Select it from the Target parameter dropdown. You can have one target parameter at a time.
Only rows that can be used in group-level calculations are available. External data rows and text rows are excluded, and a row you have already chosen as a sensitivity parameter cannot also be the target.
Selecting sensitivity parameters
Select one or more model rows from the Sensitivity parameters selector. Rows are picked per model block. Capex Management blocks are not available for selection, and the row currently used as the target parameter is excluded. You can select up to 500 sensitivity parameters.
💡 Tip: Choose parameters that represent the key assumptions in your model, such as revenue growth, operating costs, or capital expenditure. The report is most useful when your selected parameters reflect the areas of greatest uncertainty in your strategy.
Choosing parameters that work together
For meaningful results, make sure each sensitivity parameter feeds into the target parameter. If your target is NPV, for example, choose sensitivity parameters that contribute to the NPV calculation such as revenue, costs, and capital expenditure.
The system does not check the relationship between the two. If you select a sensitivity parameter that does not feed into the target, its columns will simply repeat the Before value, showing no change. That judgment is yours to make.
How values are calculated
When a sensitivity parameter is varied, the system recalculates the target parameter by following the full dependency tree from the sensitivity parameter to the target. Every model row that sits in that chain is recalculated along the way, so the result reflects how your model is actually built.
For each alternative, for each sensitivity parameter, and for the selected calculation period, the system:
Calculates the Before value of the target parameter with no variation applied.
Increases the sensitivity parameter by 10% and recalculates the target parameter.
Decreases the sensitivity parameter by 10% and recalculates the target parameter.
The calculation always runs on current model data, so any manual edits you have made to the target or sensitivity parameter rows are taken into account.
The ±10% variation is fixed for all sensitivity parameters.
How numbers are formatted
All value cells, meaning the Before column and the ±10% columns, use the Period 1 value format of the selected target row as configured in Model Building. That is where the number of decimals and the percentage or plain-number style come from. If you change the target row's Period 1 format in Model Building, the report display changes with it.
Decimal and thousands separators follow your own user settings, so colleagues may see different separators for the same report.
The report always calculates at full precision. Only the displayed value is rounded.
Reading the report
When you open the report, calculations run in real time and a progress bar shows how many alternatives have been processed. With a large number of active alternatives this can take a while.
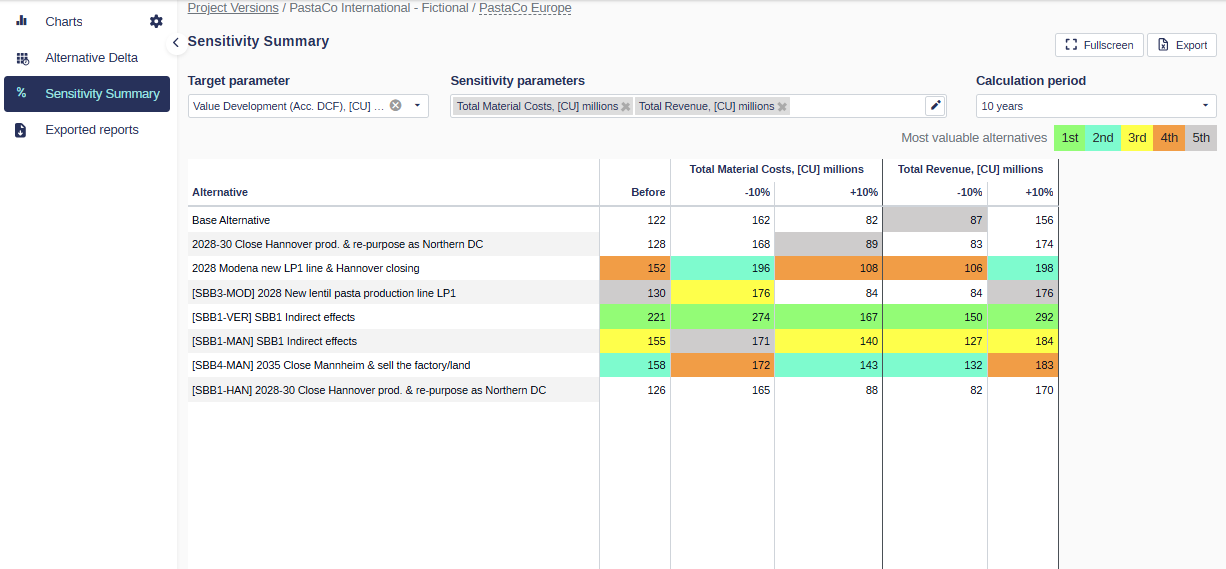
The table is laid out as follows:
Each row is an alternative.
The Before column shows the target parameter value with no variation.
Each sensitivity parameter adds two columns, -10% and +10%.
The report header shows your selected target parameter, sensitivity parameters, and calculation period, so you can always see which configuration produced the results on screen.
Use the Fullscreen button in the top right corner to expand the report to the full browser window.
Alternatives that cannot be calculated
An alternative can only take part if its target parameter is a value the system can recalculate. If the target parameter is a manually entered constant value at the selected calculation period, there is nothing to vary, so its result cells are left blank and the alternative is left out of the ranking. In most cases a warning icon appears on the row to explain why. To include the alternative, replace the manual value with a calculated expression.
📌 Note: Treat the warning icon as a helpful pointer rather than a guarantee. If an alternative's results look unexpected, or an alternative you expected to see is missing from the ranking, check that its target parameter is a calculated row rather than a manually entered value.
Ranking and highlighting
For each result column, alternatives are ranked by value. The top 5 are highlighted and labelled as Most valuable alternatives:
Rank | Colour |
|---|---|
1st | Green |
2nd | Cyan |
3rd | Yellow |
4th | Orange |
5th | Gray |
Alternatives with the same value in a column share the same rank and colour, and the next distinct value takes the next rank. Alternatives ranked 6th or lower are not highlighted.
The ranking legend is shown in the report header.
Working with large tables
Header rows stay visible while you scroll.
The Alternative and Before columns stay fixed when you scroll horizontally.
Columns can be resized, and the -10% and +10% columns have consistent widths.
Long alternative names are shortened, with the full name shown on hover.
Exporting to Excel
Export the report to Excel (.xlsx) using the Export button in the top right corner. The export is what-you-see-is-what-you-get, so the file matches the report on screen, including:
Your configured target parameter and sensitivity parameters, as column headers.
All displayed alternatives and the column structure.
Ranking highlights and colours.
The Export button is unavailable until the report has been configured.
If you used sensitivity analysis before
The Sensitivity Summary has been rebuilt, and a few things work differently:
No setup required. The report is available in every project. The "Use sensitivity" project setting is no longer needed.
You choose the parameters. Previously the available parameters depended on how the model was configured. Now you select any suitable model row as your target and your sensitivity drivers, directly in the report header.
Results follow your model. Calculations trace the dependencies in your own model rather than a fixed calculation path.
The period is measured differently. Calculation periods now run forward from your project's current reporting year.
Export moved. Export is now a button in the report header rather than an action in the Presentations menu.
⚠️ Warning: Your previous sensitivity configuration is not carried over. After upgrading, set the target parameter and sensitivity parameters again in the report header.