SSO Configuration
The SSO configuration page lets you connect your organization's OpenID Connect (OIDC) identity provider to Weissr yourself, without involving Weissr support and without a server restart. It is managed in Administration → Security → SSO configuration and applies to your whole environment. This guide is for superusers and administrators who own identity and access management for your Weissr environment. Self-service SSO configuration was introduced in version 5.3.3.
Before you start
You need the following in place before configuring a provider:
The OAuth profile must be enabled on your Weissr environment. This is a server-side setting, so contact Weissr support if you are unsure whether it is active.
The Administrator global permission, which grants access to the Administration page.
Rights in your identity provider to create an application registration and read its client ID, client secret, and issuer URI.
Note: If the OAuth profile is not enabled, configuration entered in the UI will not take effect, even after saving.
How SSO configuration works
Each identity provider you connect is stored as a provider with its own Registration ID. Providers appear on the login page as sign-in buttons, and users who authenticate through them are handled as external users whose credentials are managed in your identity provider rather than in Weissr.
Two behaviors are worth knowing up front:
Configuration entered here takes precedence over any earlier server-side configuration that uses the same Registration ID. Environments that were set up by Weissr keep working, and what you enter in the UI for a matching Registration ID overrides it.
Changes apply without a server restart. This includes replacing a client secret, so you can rotate credentials on your own schedule.
Adding an SSO provider
Go to Administration → Security → SSO configuration.
Click + Add provider. If no providers exist yet, the page shows a "No provider configured" message.
Fill in the provider details described in the field reference below.
Copy the Redirect URI and register it in your identity provider's application registration. Use the copy icon next to the field.
Expand Advanced settings (SSO claim mapping) and set the scopes and login behavior for this provider.
Click Test connection to verify the details before committing them.
Click Save.
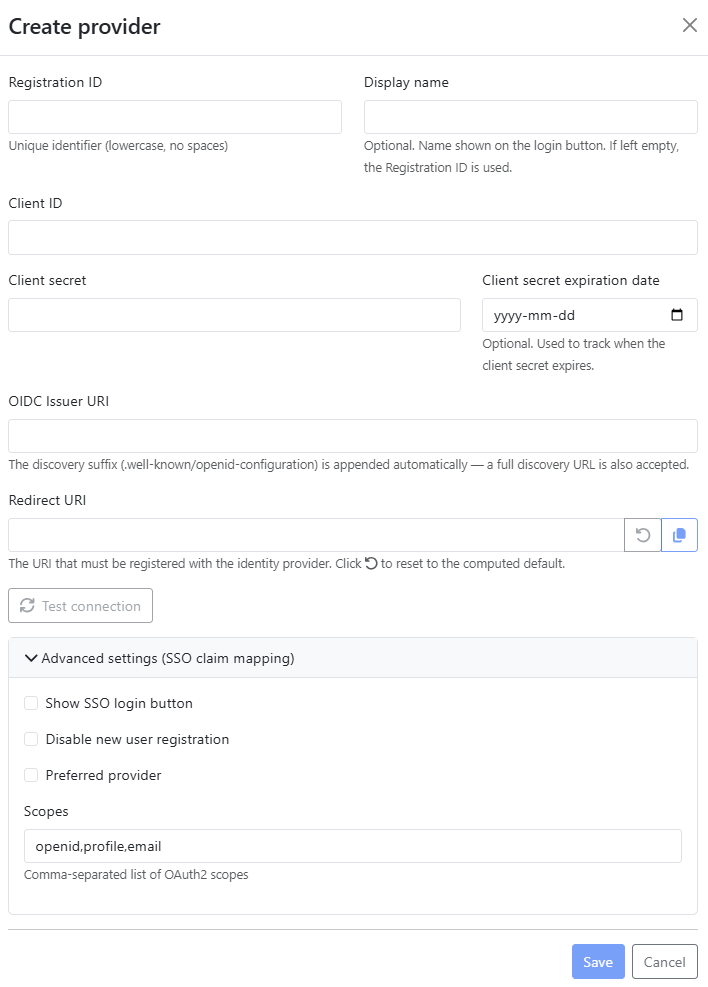
Field reference
Field | Required | What it does |
|---|---|---|
Registration ID | Yes | Unique identifier for the provider, lowercase and without spaces. |
Display name | No | The name shown on the login button. If left empty, the Registration ID is used instead. |
Client ID | Yes | The client ID from your identity provider's application registration. |
Client secret | Yes | The client secret from your identity provider. Can be replaced later without a restart. |
Client secret expiration date | No | For your own tracking of when the secret expires. It does not affect authentication. |
OIDC Issuer URI | Yes | Your provider's issuer URI. The discovery suffix (.well-known/openid-configuration) is appended automatically, and a full discovery URL is also accepted. |
Redirect URI | Yes | The URI that must be registered with your identity provider. Weissr computes a default; use the reset icon to return to it after an edit. |
Tip: The Issuer URI must point at the full OIDC issuer path, not just your provider's domain. For OneLogin, for example, this means https://yourcompany.onelogin.com/oidc/2 rather than https://yourcompany.onelogin.com. A domain-only value will fail the connection test.
Advanced settings (SSO claim mapping)
Expand Advanced settings (SSO claim mapping) in the provider dialog to control the scopes requested from your identity provider and how the provider behaves on the login page.
Setting | Default on a new provider | What it does |
|---|---|---|
Show SSO login button | Cleared | Controls whether this provider's button appears on the Weissr login page. Leave it cleared while you set the provider up, then select it when you are ready to open SSO to your users. |
Disable new user registration | Cleared | When cleared, a user who authenticates through this provider for the first time is created in Weissr automatically. Select it to allow only users who already exist in Weissr to sign in. |
Preferred provider | Cleared | Marks this provider as the preferred sign-in route on the login page. |
Scopes | openid,profile,email | Comma-separated list of OAuth2 scopes requested from the identity provider. |
Tip: If you rely on group membership from your identity provider to control access in Weissr, add "groups" to the scopes list. Without it the token carries no group claim, and users will authenticate successfully but end up with no permissions.
Testing the connection
Test connection validates the details you entered against your identity provider before you save.
Errors are expanded automatically so you can see what failed.
Save is blocked while a mandatory field is empty or a URI is not in a valid format.
The most common causes of a failed test are an Issuer URI that is missing its path segment, a client secret that has been rotated in the identity provider but not updated in Weissr, and a Redirect URI that has not yet been registered on the provider side.
Managing providers after setup
The SSO configuration page lists every configured provider so you can maintain them over time.
Showing or hiding a provider on the login page
Login button visibility is controlled by Show SSO login button under Advanced settings in the provider dialog. Clear the checkbox to take a provider out of use without deleting its configuration, for example while you troubleshoot or migrate between identity providers.
User impact: Clearing Show SSO login button removes the provider's button from the login page. Users who sign in through it will no longer be able to authenticate, so make sure an alternative route into the environment exists first.
Rotating a client secret
Go to Administration → Security → SSO configuration and open the provider.
Replace the value in Client secret.
Optionally update Client secret expiration date to the new expiry.
Click Test connection, then Save.
The new secret takes effect immediately. No server restart and no Weissr involvement are needed.
Tip: Fill in the expiration date when you create or rotate a secret. It gives you a record of when the next rotation is due, which is the most common cause of an SSO outage.
Deleting a provider
Deleting a provider removes its configuration and its login button.
Warning: Deleting a provider is not reversible. Users who authenticate through it lose access at once, and you will need the client ID, client secret, and issuer URI again to recreate it. Clear Show SSO login button instead if you only need to pause the provider.
Giving SSO users access to Weissr
Configuring a provider lets users authenticate. It does not by itself grant them any permissions in Weissr. Access comes from user groups, so assign the relevant user groups for the users who sign in through the provider.
If group mapping is missing, a user can authenticate successfully and still land on an empty screen with a message that they are not authorized. That symptom points at group assignment or a missing groups scope, not at the provider details themselves.
👉 Learn more about users and user groups
Troubleshooting
Symptom | Likely cause | What to do |
|---|---|---|
No login button on the login page | Show SSO login button is cleared, or configuration was saved without the OAuth profile enabled | Select the checkbox in Advanced settings, then confirm the OAuth profile is active with Weissr support |
Test connection fails on the Issuer URI | The URI is missing its issuer path segment | Enter the full issuer path, for example https://yourcompany.onelogin.com/oidc/2 |
Test connection fails on credentials | Client ID or client secret does not match the identity provider | Re-copy both values from the application registration and test again |
User authenticates but sees an empty screen and an authorization message | No group claim is being sent, or the user's groups are not mapped to Weissr user groups | Add groups to the scopes list, then check the user group assignment. If your provider sends group IDs rather than names, the group ID must be recorded on the Weissr user group |
Sign-in redirects fail after saving | The Redirect URI in Weissr is not registered in the identity provider | Copy the Redirect URI from the provider dialog and add it to the application registration |
A new user is not created on first login | Disable new user registration is selected for this provider | Clear the checkbox, or create the user in Weissr first |
Moving an existing SSO setup into the UI
If Weissr set up SSO for your environment before version 5.3.3, you can take over management yourself without downtime:
Ask Weissr support for the Registration ID used in your current setup.
Create a provider in the UI with that same value in Registration ID.
Enter the same client ID, client secret, issuer URI, and scopes, then test and save.
From then on your UI configuration takes precedence, which means later credential changes no longer require Weissr involvement or a restart.